How To Get the Most Out of Your Laundry Room

The other day I was fighting my way to the washing machine in what should be our laundry room (but has since become our catch-all room), and decided that our current system just wasn’t working. Our ironing board hung on the back of the door, so that besides wobbling rather sinisterly whenever you set the iron down, no one could enter the room if you were using it. Plus, the outlet was on the opposite side of the room–major tripping hazard, at least for anyone who had managed to squeeze inside before the ironing began.
Also, there was no place for us to fold our clothes, so that our usual routine was to take whatever was in the dryer into the next room and dump it onto our couch. This made our puppy very happy, but meant that our family room was in a constant state of disarray.
I’m currently working on this room and hope to have it finished by the end of the week, at which point I’ll post a Before & After. But for now, I thought I’d share some tips for general laundry room organization and some photos of my progress.
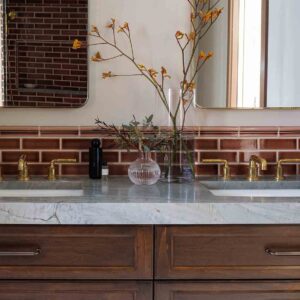
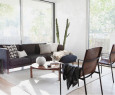
But first, here’s a laundry room design to drool over:

Deko Magazine Home via style-files.com
Anna’s Tips for Organizing Your Laundry Room
- Decide on a sorting system for dirty clothes. Do you separate by family member? By water temperature? By light and dark? Knowing the answer to these questions will give you an idea of how many, if any, baskets you will need in the room. We sort by water temperature mostly, so I decided I wanted four baskets that would stay in the room: hot, cold, warm, and delicate. If you are a family that pre-sorts and just loads right into the washer, then you might not need any baskets at all. However, I usually find that I’m doing all the laundry all at once, and have several loads waiting in the wings.
- Create a surface for folding and sorting clean clothes. If you have a side-by-side washer and dryer, there may be no need for this. But if yours stack like mine, this is a very necessary feature! I decided to make a long, wide shelf that will set into a niche. I plan on placing the laundry baskets underneath, and a stool in front so I can sit while I fold. Simply buy a few brackets and a piece of plywood, have it cut at the store, and you’ve got yourself a nice flat surface! Below, you can see how Shayna over at The Wood Grain Cottage added a sofa table, and it looks fabulous.
- Install a rod for hanging ironed clothing. There are many ways of doing this, but make sure it can support a good amount of weight. Home Depot, Amazon, and the Container Store have good solutions.
- Keep your cleaning equipment here. If you attach any kind of peg rack to a wall, you can then hang your broom, mop, duster, dustpan, brushes, etc. there, and it will look cute and organized. You can even color-block the handles with some spray paint to make them look more cohesive. Mine were spread out around the house (kitchen cabinet, various closets), and I’m looking forward to having everything in one place.
- Add some shelving. Shelves are always a good thing!
- Decorate it like any other room in your house. Laundry rooms often get neglected…only the family sees them, and they usually aren’t high on anyone’s priority list. But a finished, beautiful room will make doing laundry much more enjoyable, and probably give you some peace of mind. Cluttered, neglected spaces tend to bother me, so I am really looking forward to my finished room. Play with color. Add a rug and an interesting light fixture. Pop in some plants (fake if there isn’t much light).
- Get a drying rack that attaches to the wall. Unless your laundry room is the Taj Mahal, you will appreciate the extra floor space. Mine are from Ikea, and they collapse!
- And finally…think through the logistics. Think about the location of your dryer and its proximity to where you’d like to fold, hang, and iron. Make these tasks as near to each other as possible. Put the cleaning products near the right equipment. Try to make the room as efficient as possible. You might want to do a few sketches of your design, think about it for a week, revisit, etc. My plan changed several times from the original, and each time it got better. You can do it!
So! Here is my before picture:

Here is my current progress:

Yay for color-blocking! I got oops! paint at Home Depot that was zero-VOC and only $7. This color-blocking was super easy to do, and is a great way to add a bold color without getting too crazy (and without making the space seem smaller).
And here is my plan for the rest of the room:

Check back later this week for the after picture!
Related Posts
 MIXING OLD + NEW DESIGN IN HISTORIC HOMESCohesiveness is the end goal of a well-designed home. If you live in an older house that’s been subjected to multiple remodels by previous ...
 What Does Slow Living Mean?An Interview with the Annabode Team Sometimes I wish I could return to my childhood—before the internet, cell phones, and endless channels and ...
 A Complete Guide to Sustainable Design in 2025Sustainable design aims to reduce waste, conserve resources, and encourage human and ecological health. In other words – it’s the way we ...
Popular Articles


TO DO LIST
- Read this book.
- And this one.
- Keep what you need.
- Donate what you don't.
- Design mindfully.

Austin (@smithaustint)
| 10 July 2014It looks great!
Annabode.
| 10 July 2014Thank you! The shelf is coming along nicely. Pictures soon.